


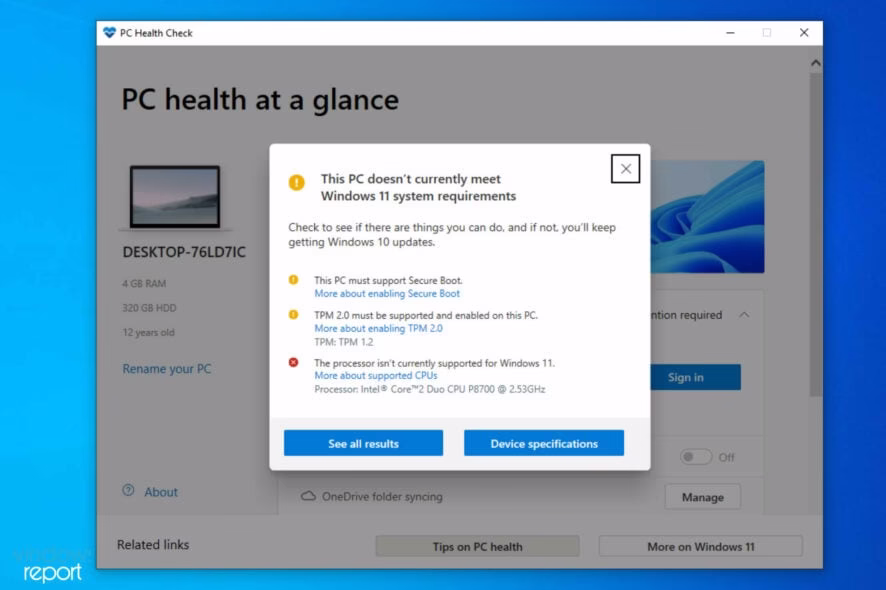
Many people search for How To Install Windows 11 On Unsupported CPU after seeing the message “This PC can’t run Windows 11” on a computer that still feels fast. This situation is common for users with older Intel Core, AMD Ryzen, or Xeon chips that run Windows 10 well but fail Microsoft’s Windows 11 checks.
This guide is written for intermediate Windows users and PC hobbyists. The readers are comfortable:
- Creating a bootable USB drive
- Entering the BIOS or UEFI
- Following clear, step-by-step instructions
The main goal is simple: install Windows 11 on a CPU that Microsoft does not support, while keeping the process as safe and easy as possible.
The guide explains what “unsupported CPU” means, then covers two primary methods:
- A registry edit during setup
- A bootable USB created with bypass options
The article also looks at performance, updates, and cases where staying on Windows 10 is the better choice. With backups prepared, most users can complete the upgrade in a single session.

What “Unsupported CPU” Means For Windows 11
Microsoft keeps an official list of processors that pass its Windows 11 checks. If your CPU does not appear on that list, the installer flags it as unsupported.
This affects many older but capable processors, such as:
- 4th-generation Intel Core chips and some earlier models
- First generation and early AMD Ryzen series
- Older Xeon CPUs used in workstations
According to Microsoft’s Windows 11 specs and system requirements, every PC must meet stricter rules than Windows 10. Many of these rules focus on security features and newer hardware standards.
Key Windows 11 requirements:
- 64-bit CPU on Microsoft’s supported list
- 4 GB of RAM or more
- 64 GB of storage or more
- TPM 2.0 (Trusted Platform Module)
- Secure Boot support in UEFI
- DirectX 12 compatible graphics
- Display at least 9 inches, 720p or higher
Recent Windows 11 builds also rely on CPU instruction sets such as SSE4.2 and POPCNT. These are low-level CPU features used by newer code. Most processors from the last decade support them, but ancient chips do not.
Microsoft tightened these rules to:
- Raise the security baseline
- Improve support for virtualization and modern features
- Limit testing to newer, more consistent platforms
Windows 10 is still widely used, but support for Home and Pro editions ends on October 14, 2025. After that date, most home users will not receive security updates. Many households and small offices still rely on older PCs, so interest in a Windows 11 unsupported hardware workaround is growing.
Why Your Processor Fails The Windows 11 Check
Many PCs with 4th-gen Intel Core chips, first-wave Ryzen processors, or older Xeon CPUs still run browsers, office apps, and games without trouble. An SSD and 8 GB of RAM or more often make these systems feel quick.
They fail the Windows 11 check because Microsoft accepts only a defined list of processors. “Unsupported” does not mean the CPU is slow or faulty. It means Microsoft does not commit to testing and supporting that chip for Windows 11.
The installer checks:
- The CPU model against its internal list
- The presence of TPM 2.0
- Secure Boot status
If any main check fails, the install is blocked, even if the PC could run the operating system from a performance standpoint.
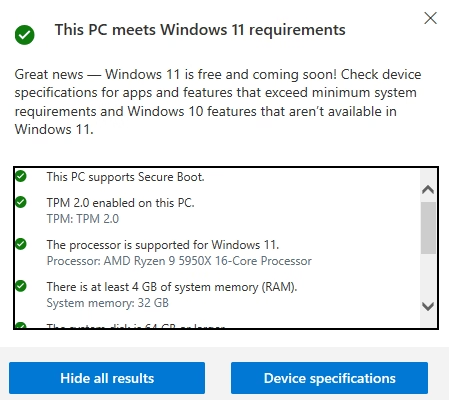
Core Windows 11 Requirements To Understand Before Bypassing Them

Before using any bypass, it helps to know the main requirements in simple terms.
- CPU generation
- Intel: 8th-gen Core and newer are on the list
- AMD: Ryzen 2000 and newer are on the list
- Older CPUs are blocked by policy
- 64-bit only
- Windows 11 runs only on 64-bit hardware
- There is no 32-bit edition
- Memory (RAM)
- Minimum: 4 GB
- Recommended: 8 GB or more for smooth use
- Storage
- At least 64 GB of free space
- SSD is strongly recommended over a hard drive
- TPM 2.0
- A security chip or firmware feature
- Supports BitLocker and secure key storage
- Secure Boot
- A UEFI setting that checks boot files for tampering
- Graphics
- GPU or integrated graphics must support DirectX 12
- Instruction sets
- SSE4.2 and POPCNT should be supported for recent builds
Bypasses can skip some checks, but the closer your PC is to these standards, the better Windows 11 will run.
Why This Topic Is Important Now
Windows 10 support for most home and small-office users ends in October 2025. After that, new security patches will not arrive unless users pay for special programs.
At the same time:
- New software is starting to target Windows 11 first
- New features from Microsoft land on Windows 11, not Windows 10
- Many users want to avoid buying a new PC while their current system still works well
Learning How To Install Windows 11 On Unsupported CPU gives users more control. It can extend the life of older systems, especially for backup or personal use, while they plan for a future hardware upgrade.
Before You Start: Check Hardware, Back Up, And Pick Your Plan
Good preparation reduces the risk of data loss and failed installations.
Step 1: Check If Your CPU And PC Are A Good Match For Windows 11
Many Intel and AMD CPUs from the last 10 years can run Windows 11 well when paired with enough RAM and an SSD.
Simple checks in Windows 10:
- Confirm 64-bit support
- Open Settings → System → About
- Under “System type,” look for “64-bit operating system” and “x64-based processor.”
- Check cores and speed
- Open Task Manager and go to the Performance tab, then CPU
- Note the number of cores and base clock speed
- For a smooth experience, four cores or fast dual-core CPUs are better
- Check SSE4.2 and POPCNT support
- Use tools like CPU-Z to list supported instruction sets
- Most 4th-gen Intel Core and newer, and most Ryzen chips, support SSE4.2 and POPCNT
- Very old CPUs, such as Core 2 Duo or first-gen Phenom, may lack support and can run into issues with newer builds
If the CPU is 64-bit, supports SSE4.2 and POPCNT, the system has at least 8 GB of RAM, and it runs on an SSD, Windows 11 usually feels solid in daily use, even if the processor is flagged as unsupported.
Step 2: Back Up Your Files
Backups are essential before any major upgrade. Even careful installs can fail.
Practical backup checklist:
- Copy Documents, Pictures, Desktop, and important project folders to an external drive
- Store critical files in a cloud service for extra safety
- If you know how, create a full system image of your current Windows 10 setup
- Save or write down:
- Product keys for paid software
- Any passwords not saved to your browser or cloud account
Creating a Windows 10 USB installer or recovery drive is also useful. If Windows 11 does not work well, you can return to Windows 10 and restore your data.
Step 3: Decide Between an In-Place Upgrade Or a Clean Install
Two main install paths are available.
In-place upgrade
- Start Windows 11 setup from inside Windows 10
- Keep files, programs, and most settings
- Faster and less work, but may carry old problems into the new system
Clean install
- Boot from a USB drive and install Windows 11 on a formatted or new partition
- Removes old errors and leftover files
- Requires reinstalling all apps and restoring data from backup
For many users, the in-place upgrade with a registry bypass is the easiest option. If the current Windows 10 setup is slow or unstable, a clean install from a USB drive is usually a better long-term choice.
Step 4: Quick BIOS/UEFI Checks
Some settings may need to be checked before installation.
Typical steps:
- When the PC powers on, press F2, Del, F10, or Esc to open BIOS or UEFI
- In the Boot section:
- Confirm that USB boot is enabled
- Set the USB drive near the top of the boot order, or use a one-time boot key like F12 or Esc
Secure Boot is usually found in the Boot or Security menu:
- Many users can leave Secure Boot enabled when using tools like Rufus
- If boot problems appear, Secure Boot can be turned off temporarily, then turned back on later
Write down any settings you change so you can restore them if needed.
Method 1: Registry Bypass For In-Place Upgrade
This method uses an official Windows 11 ISO from Microsoft and a manual registry tweak. It works well for upgrading from Windows 10 without wiping data.
No third-party scripts are involved. The user makes all changes.
Warning: Mistakes in the registry can cause Windows to break. Follow each step carefully and keep backups ready.
Step 1: Download The Official Windows 11 ISO
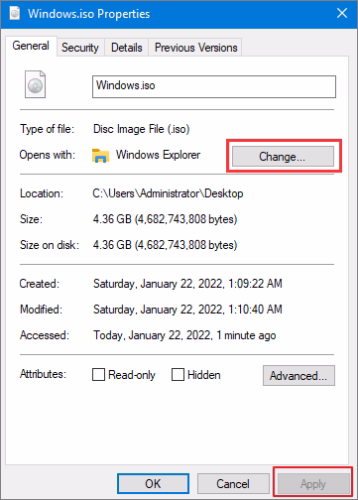
- Go to the official Windows 11 download page on Microsoft’s site
- Download:
- The Windows 11 ISO directly, or
- Use theMedia Creation Tool to create an ISO
- In Windows 10, right-click the ISO file and choose Mount
- A new drive letter appears in File Explorer
- Open that drive and double-click setup.exe
- Choose whether to download updates during setup
- Continue until the installer runs compatibility checks
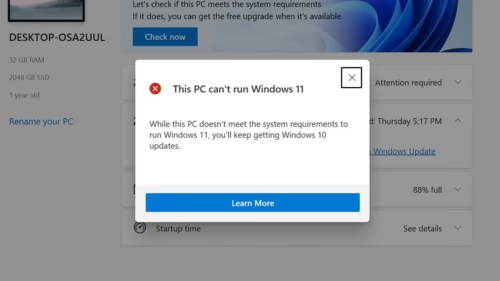
If your CPU or TPM does not meet Microsoft’s requirements, you see the message, “This PC can’t run Windows 11.”
Do not close the installer at this point. The bypass happens while this screen is showing.
Step 2: Create The LabConfig Registry Keys
With the blocked setup screen open:
- Press Shift + F10 to open a command prompt
- Type
regeditand press Enter to open Registry Editor
The registry holds many system settings. In this case, a few keys will tell the installer to skip some hardware checks.
3. In Registry Editor, go to:
HKEY_LOCAL_MACHINE\SYSTEM\Setup
4. Right-click the Setup folder in the left panel
5. Select New, then Key, and name it LabConfig
6. Click the new LabConfig key
Now add values that bypass checks:
7. In the right panel, right-click and select New → DWORD (32-bit) Value
- Name it BypassTPMCheck
- Double-click it and set the Value data to
1
- Repeat to add:
- BypassSecureBootCheck with value
1 - BypassCPUCheck with value
1
- BypassSecureBootCheck with value
In simple terms:
BypassTPMCheckignores the TPM version checkBypassSecureBootCheckignores the Secure Boot requirementBypassCPUCheckignores the supported CPU list
Close Registry Editor and the command prompt.
Step 3: Resume Setup
Go back to the Windows 11 setup screen:
- Click the back arrow once, then move forward again, or restart the check
- The “This PC can’t run Windows 11” message should no longer appear
- Accept the license terms
- Choose Keep personal files and apps if you want an in-place upgrade
- Start the installation
The PC may restart several times. Install time is longer on older hardware. Do not shut down the PC during the process.
On first boot into Windows 11:
- Follow the setup screens
- Sign in with a Microsoft account or use a local account
- Let Windows Update run to install drivers and patches
- Open Device Manager and check for missing drivers
On many unsupported 4th-gen Intel Core and early Ryzen PCs with 8 GB of RAM and an SSD, performance feels close to a tuned Windows 10 install.
Registry Bypass Method: Pros And Cons
Pros
- Uses only official Microsoft ISO files
- No third-party bypass scripts
- Allows in-place upgrade that keeps apps and data
- Good fit when the current Windows 10 install is already stable
Cons
- Manual registry editing carries some risk
- Works only if Windows 10 boots and runs setup correctly
- Does not remove deep problems like corruption or long-term clutter
- Future Windows 11 builds may change behavior so that steps may need updates
For many intermediate users, this method is a logical first attempt.
Method 2: Bootable USB That Skips CPU Checks
This method uses a bootable USB created with a tool such as Rufus. The tool adjusts the setup files so the installer no longer blocks unsupported CPUs, missing TPM 2.0, or disabled Secure Boot.
A bootable USB lets the PC start directly into the Windows 11 installer. This method works well for clean installs and for PCs where Windows 10 no longer boots.
Step 1: Prepare A Windows 11 ISO And USB Drive
You will need:
- One USB flash drive with at least 8 GB capacity
- A Windows 11 ISO downloaded from Microsoft
- The latest version of Rufus
Steps:
- Move any important files off the USB drive, since it will be erased
- Open Rufus
- Under Device, select your USB drive
- Under Boot selection, pick Disk or ISO image, then click Select and choose the Windows 11 ISO
- For most modern systems:
- Partition scheme: GPT
- Target system: UEFI (non-CSM)
This setup matches most PCs built over the last decade.
Step 2: Use Rufus To Disable CPU, TPM, And Secure Boot Checks
When you click Start, newer Rufus versions detect the Windows 11 ISO and show extra options.
You typically see check boxes such as:
- Remove requirement for 4 GB+ RAM
- Remove requirement for Secure Boot
- Remove the requirement for TPM 2.0
- Remove the requirement for a supported CPU
Select the options that match your hardware; typically, all three are related to CPU, TPM, and Secure Boot. These changes tell the Windows 11 installer not to block your system.
Rufus may also offer to skip some region and privacy questions. Those options are personal choice.
When ready:
- Confirm the correct USB drive is selected
- Click Start
- Wait for the process to complete
You now have a bootable USB drive that helps install Windows 11 on unsupported hardware.
Step 3: Boot From USB And Install Windows 11
To install:
- Insert the USB drive into the target PC
- Turn on the PC and press the boot menu key, often F12, Esc, or F8
- Choose the USB drive from the list
- Wait for the Windows 11 installer to load
From here, you can choose between two paths.
Upgrade without wiping (less common from USB)
- Sometimes the installer detects the existing Windows 10 setup
- You may be able to keep files during installation
- This route is less reliable from USB and may not always be offered
Clean install
- At the disk selection screen, find the partition with Windows 10
- Make sure your backup is complete
- Delete or format that partition
- Select it as the install target and continue
If USB boot issues appear, try:
- A different USB port, often a USB 2.0 port on older boards
- Recreating the USB with different options in Rufus, such as MBR + BIOS if your system uses legacy boot
- Adjusting BIOS settings to match UEFI or legacy mode as needed
USB Method: Pros And Cons
Pros
- Best suited for clean installs and fresh starts
- Often fixes problems that block in-place upgrades
- Handy when Windows 10 is broken or will not boot
- Reusable on several unsupported PCs
Cons
- Requires careful work with partitions to avoid wiping the wrong drive
- A clean install means reinstalling all apps and restoring data
- Boot problems can appear on Old boards or a mix of legacy / UEFI setups
Many enthusiasts keep a Rufus USB ready for testing Windows 11 on different machines.
Registry Bypass Versus Bootable USB
In real use:
- The registry bypass is better when:
- Windows 10 already runs well
- You want to keep the existing software and files
- You prefer to rely only on official Microsoft tools
- The Rufus USB method is better when:
- A clean install is preferred
- The current system is slow, cluttered, or broken
- You maintain several PCs and want a reusable installer
Some users start with a registry bypass. If problems show up later, they switch to the USB clean install method.
What To Expect After Installing Windows 11 On An Unsupported CPU
Once installed, Windows 11 often runs much like it does on supported hardware, as long as the CPU and RAM are reasonably modern.
Performance And Daily Use
Testing on mid-range hardware such as:
- Intel 4th-gen Core i5 and i7 with 8 to 16 GB of RAM
- Early Ryzen 5 and Ryzen 7 chips paired with SSDs
Shows that Windows 11 typically offers:
- Boot times close to, or slightly better than, Windows 10 on the same SSD
- Smooth web browsing, office work, streaming, and light photo editing
- Game performance is similar to Windows 10 when using the same GPU drivers
When CPUs support SSE4.2 and POPCNT, stability is usually strong. Performance depends more on RAM, storage, and GPU than on whether the CPU is on Microsoft’s supported list.
On very old CPUs or machines with 4 GB of RAM and a slow hard drive, Windows 11 can feel heavy and may stutter, even with bypasses in place.
Windows Updates And Drivers On Unsupported Hardware
As of late 2025:
- Many unsupported CPUs still receive monthly cumulative updates after installation
- Large feature updates can be less reliable and may fail or roll back
- Microsoft states that updates on unsupported hardware are not guaranteed and may change in the future
If a big update fails:
- Windows often rolls back to the previous version automatically
- You can delay feature updates or use metered connections to slow them down
- A clean install from a newer ISO is sometimes the cleanest way to move to a new version
Driver support can be a bigger challenge than CPU support. For older hardware:
- Integrated graphics and Wi-Fi cards may need drivers from Intel, AMD, or the motherboard vendor
- Older driver versions sometimes work better than the latest ones
Treat unsupported systems as secondary or test machines. For work-critical tasks, a fully supported platform is safer.
When Staying On Windows 10 Makes More Sense
Some setups are not a good fit for Windows 11, even with bypasses.
Examples:
- CPUs that do not support SSE4.2 or POPCNT, and crash on new Windows 11 builds
- Systems with only 4 GB of RAM and a spinning hard drive
- Machines that freeze or show blue screens in Windows 11, but run Windows 10 without issues
In these cases, a well-tuned Windows 10 install, ideally with an SSD upgrade, often gives a smoother experience. Staying on Windows 10 while planning a future hardware replacement is a reasonable choice.
Troubleshooting Common Problems
Older PCs often show some issues during or after installation. Many are easy to fix with a few checks.
Set up Freezes, USB Boot Problems, And Driver Issues
Installer stuck on logo or spinning dots
- Wait at least 20 to 30 minutes, especially on slow hardware
- Disconnect extra USB device,s such as printers and external drives
- Run memory diagnostics if the freeze happens again
USB drive not visible in boot menu
- Try a different port, ideally a USB 2.0 port on older boards
- Recreate the USB in Rufus, checking thatthe partition scheme and target system match your BIOS mode
- In BIOS or UEFI, confirm that USB boot is allowed
The installer does not see your main drive
- Some systems need extra SATA or NVMe drivers loaded from another USB
- Check for RAID or special controller modes that hide the drive
- Where safe, change storage mode to AHCI
Crashes during install
- Check system temperatures and clean dust from fans and heatsinks
- Remove CPU or RAM overclocks
- Use vendor tools to scan the drive for bad sectors
If an in-place upgrade continues to fail, a clean install from USB often works better.
“This PC Can’t Run Windows 11” Still Appears After Bypass
The error can still show up, even after using a bypass.
Common reasons:
- A registry key was missed or has the wrong value
BypassCPUCheck,BypassTPMCheck, orBypassSecureBootChecknot set to1
- The ISO is too old or from an unofficial source
- Rufus version is outdated and lacks newer bypass options
- Other requirements are failing, such as:
- Not enough free disk space
- Mismatch between BIOS mode (legacy vs UEFI) and USB setup
Quick checklist:
- Use a fresh Windows 11 ISO from Microsoft
- Download the latest Rufus version
- Double-check spelling and values of registry keys in Method 1
- Confirm that the system has at least 4 GB of RAM and 64 GB free space
If all looks correct, recreate the USB drive or restart the process with a new ISO.
FAQ: Safety, Legality, Updates, And Rollback Options
Is installing Windows 11 on an unsupported CPU safe?
Installing Windows 11 with a bypass is reasonably safe if you:
- Use official Microsoft ISO files
- Use trusted tools like Rufus
- Create full backups first
There is still extra risk, since Microsoft does not test every update on unsupported hardware.
Is it legal to bypass CPU requirements?
If the user has a valid Windows license, using registry changes or installer options at home to bypass hardware checks is generally accepted. The process does not change Microsoft’s code for resale, but it does move outside Microsoft’s official support policy.
Will Windows Update still work?
In many cases, yes. Security and quality updates are still being downloaded and installed. There is no guarantee this will continue forever, so there is some uncertainty about the long term.
Can I go back to Windows 10?
Yes, if the correct steps are taken before upgrading.
Options:
- Restore a full system image created before the upgrade
- Reinstall Windows 10 from a USB installer and restore backed-up files
- In some cases, roll back from Settings shortly after an in-place upgrade, if Windows offers that option
Does this affect my warranty or license?
Bypassing CPU checks does typically not void a Windows license. Hardware warranties depend on the manufacturer. Installing a different Windows version rarely affects them, as long as no physical damage occurs.
Should You Keep Windows 10, Install Windows 11, Or Upgrade Hardware?
The right decision depends on the PC’s age, how it is used, and the user’s budget.
Comparing Options
Windows 10 on current hardware
- Pros: familiar, stable, officially supported until October 2025
- Cons: no new Windows features, support ending soon
Windows 11 on unsupported CPU with bypass
- Pros: access to Windows 11 interface and features, better future app support, no hardware purchase needed now
- Cons: no official support, possible update issues, extra risk of bugs
New hardware with supported CPU and Windows 11
- Pros: best performance, full support, strongest security base
- Cons: higher cost, time needed to move data, and reinstall apps
For many users, installing Windows 11 on an unsupported CPU is a practical middle step, especially for a secondary or home PC. It buys time before a full hardware upgrade.
Registry Edit, Bootable USB, Or New PC
Three common paths:
- Registry edit bypass (Method 1)
- Difficulty: medium
- Risk: registry mistakes can cause issues
- Cost: free, uses current hardware
- Time: shorter, especially for in-place upgrades
- Long-term: depends on hardware health and future update behavior
- Bootable USB with bypass options (Method 2)
- Difficulty: medium with clear steps
- Risk: wrong partition can cause data loss, the registry is not touched
- Cost: free, other than the USB drive
- Time: longer, especially for clean installs and reinstalling software
- Long-term: often cleaner and more stable than upgrades
- New, fully supported hardware
- Difficulty: higher, due to research and setup
- Risk: lowest from a support and update view, highest in cost
- Cost: most expensive option
- Time: one-time setup, then a stable platform for years
For backup or test systems, bypass methods are reasonable if done carefully. For main work or family PCs, many users choose new hardware to reduce surprises.
Conclusion
Installing Windows 11 on an unsupported CPU is possible with clear steps, careful backups, and some patience. The two main approaches, a registry bypass during setup and a custom bootable USB, cover most situations that intermediate users face.
In practice, How To Install Windows 11 On Unsupported CPU comes down to three choices:
- Stay with Windows 10 a bit longer
- Install Windows 11 on current hardware using a bypass
- Move to new hardware that fully supports Windows 11
Each path has different costs, risks, and effort. Take time to back up everything, follow instructions slowly, and avoid random tools from unknown sources. With a careful approach, older but capable PCs can continue to serve well for years.