Learning
Microsoft PowerPoint: Top 10 Tips You Need To Know!!

(CTN NEWS) – Microsoft PowerPoint is the most widely used presentation-making program for many people who work in business, education, and entertainment. It takes little time to become accustomed to using it, and is simple and quick to create.
But if you want to fully understand it and make the most of the program, keep reading as we quickly go over some of the top 10 shortcuts, tricks, and tips that will help you become an expert in PowerPoint.
The PowerPoint tips and tricks described here are for the most recent Windows version; some features may not be available or appear slightly different for macOS and web users.
1. To Rapidly Go Live, Press F5.
Don’t attempt to click the tiny icon in the bottom right corner of the screen or utilise the menu (Slide Show > From the beginning…) to start a presentation. There is a technique to do this that is considerably easier.
Just press F5 on your keyboard!
Using a simple keypress will make you look like a total pro if you have to utilize an ancient laptop without a mouse or a malfunctioning trackpad. However, some devices need you to hold down the Function key (Fn) before pressing the F5 key.
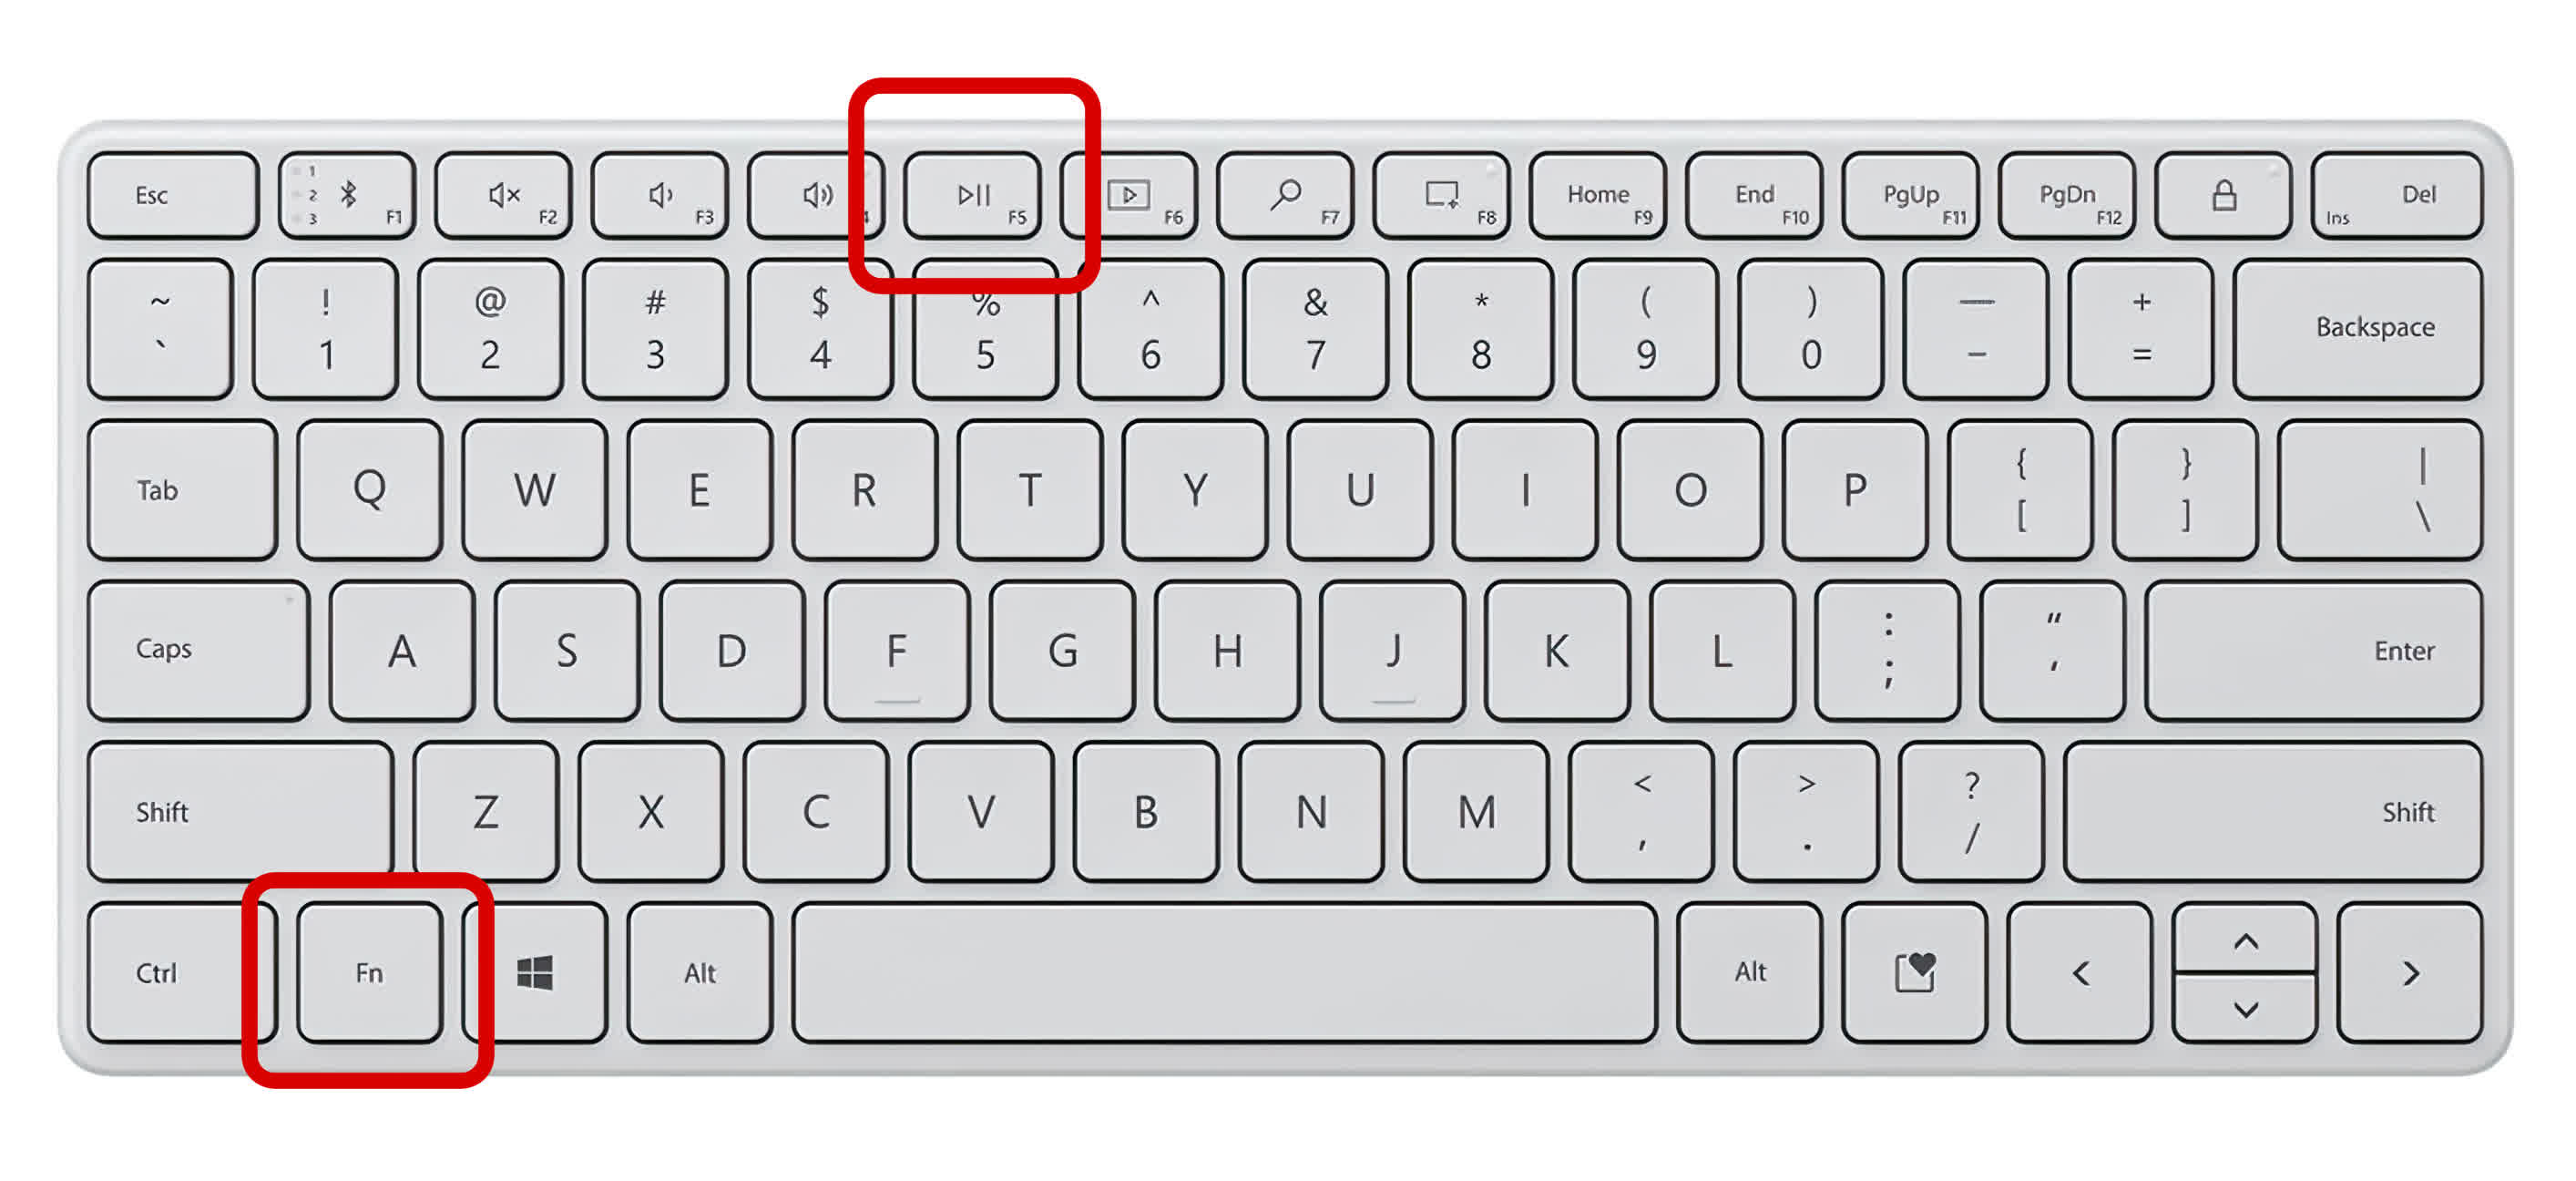
Some keyboards need you to press or hold the Fn button before hitting F5/ TechSpot.
Some keyboards require you to hold the Fn button while pressing the F5 key.
Select the slide you wish to start from and press Shift + F5 to begin a presentation anywhere in the slides list. It has never been simpler to go live.
Instead of pressing F5, macOS users should press Cmd + Shift + Return or Command + Return for Shift + F5’s counterpart.

TechSpot.
There are, of course, many more keyboard shortcuts, one for practically every PowerPoint function. It would be impossible to list them all. However, Microsoft offers two significant sets of shortcuts—one for making presentations and another for presenting them.
However, as with many Microsoft/Office programs, merely pressing ALT will show you the keys you need to press to do a particular action.
2. Using Rulers And Guides, Align Components To A Grid
Don’t waste time dragging anything with the mouse or the arrow keys to have everything in a slide aligned properly. Turn on the Snap to Grid feature instead.
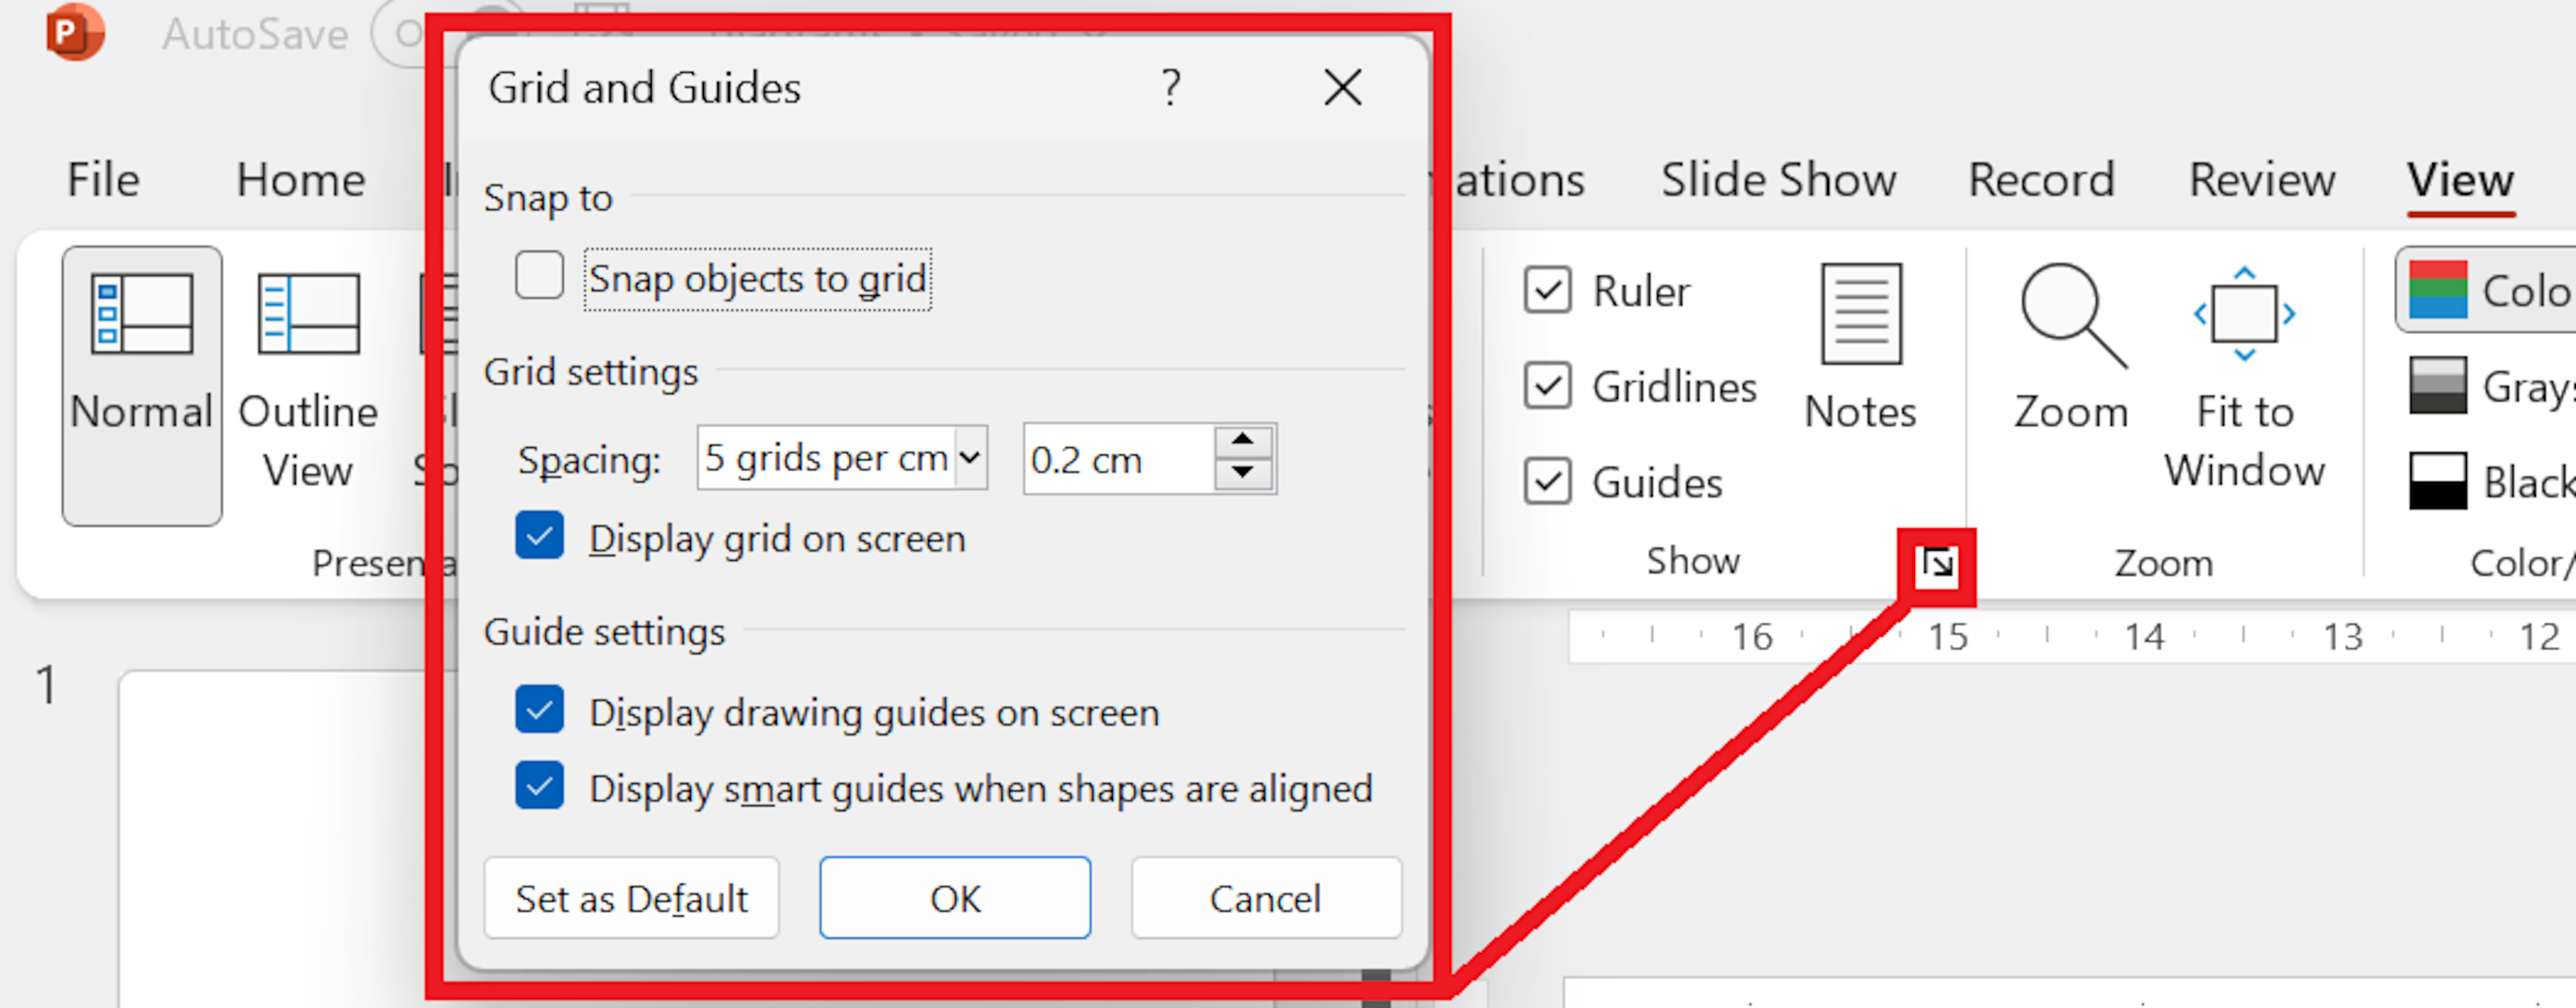
You may help with alignment and positioning by adding lines to your slides by selecting the Ruler, Gridlines, and Guides options under the View menu. However, a new window will open if you click the tiny menu button directly beneath where you enabled the guides.
TechSpot.
Here, you may turn on Snap items to grid, which causes objects to now automatically lock onto the closest gridline as you move them around.
The default number of gridlines per cm is 6, but you may modify it by using the drop-down menu or adjusting the gridline spacing. You can also set a custom number of gridlines per cm (as shown in cm).
You will obtain more gridlines per centimeter the smaller this number is.
Even with snapping turned on, if an object isn’t precisely where you want it, click on it and then move it around while holding down the CTRL key and pressing the arrow keys.
3. Professional Copycatting
Everyone knows how to copy and paste text and objects onto a PowerPoint slide by pressing CTRL + C, followed by CTRL + V. There are additional techniques, however, that are useful when creating numerous copies of the same shape to produce a symmetrical pattern.
The new shape overlaps the original when you copy something and subsequently paste it. Then, as is customary, you would move it into place using the mouse or keyboard.
Here’s a far better method: click and hold the CTRL + Shift keys as you click and hold the mouse button on the shape you want to replicate.

TechSpot.
You’ll notice that a fresh copy is automatically created and is perfectly aligned with the old one when you move the mouse to the side or up/down! No more attempting to align shapes by moving them around.
Once you’ve completed this, click CTRL + Y to go through the process again; the spacing and alignment are copied across, making it simple to assemble an exact symmetrical group of objects.
4. Using Smarts To Create Greater Art
Although you can add a wide variety of preset shapes to slides, they are devoid in originality. Breaking apart SmartArt forms is one option if you want to utilize something better but don’t want to avoid attempting to design your own.
For instance, the typical block arrows are quite uninteresting and have few uses, so let’s change that immediately.
Activate Insert > SmartArt > Process. Select Upward Arrow from the menu by swiping up from the bottom.

TechSpot.
After clicking on that, a cool-looking arrow will appear.
It’s surrounded by many things that you might not need.
Simply perform right-click on any vacant area of the newly added shape, choose Ungroup from the menu’s Group option, and then click OK. Repeat this process and then click CTRL+A to select everything on the slide.

TechSpot.
If the slide contains many items, drag a highlighting box around the arrow.
To deselect it, hold down CTRL while clicking the arrow, and then press Delete to eliminate all undesirable components.
Now that you have a neatly curved arrow, you may change its size or color to whatever you like. It’s worthwhile to investigate all of the other SmartArt elements to see what new forms you can create because this technique works with a wide variety of them.
5. Combining Clever For More Art
Using PowerPoint’s Merge Shapes tool is a helpful alternative to just grouping things together to create a new shape if you do feel like creating your own.
Imagine that we desire a square with a hole in the center. Using the standard Insert > Shapes menu, begin by placing a distinct shape and circle.
Making the circle white, laying it over the square, and assembling the pieces would allow us to create the desired object.
However, because grouped objects continue to exist as individual entities, the file size for the entire PowerPoint presentation may increase if your slides contain numerous complicated shapes.
The benefit of merging is that everything merges into one object.

TechSpot.
The obvious drawback is that you can’t ungroup something and start over if you wish to change or edit it; instead, you must use the Undo feature (CTRL + Z). Yes, but only if you choose one of the merge choices.
Select the forms you wish to combine by dragging a highlighting box around them (click and hold the left mouse button) or by holding down the CTRL while you click on each of the separate shapes.
There are five methods for combining shapes:
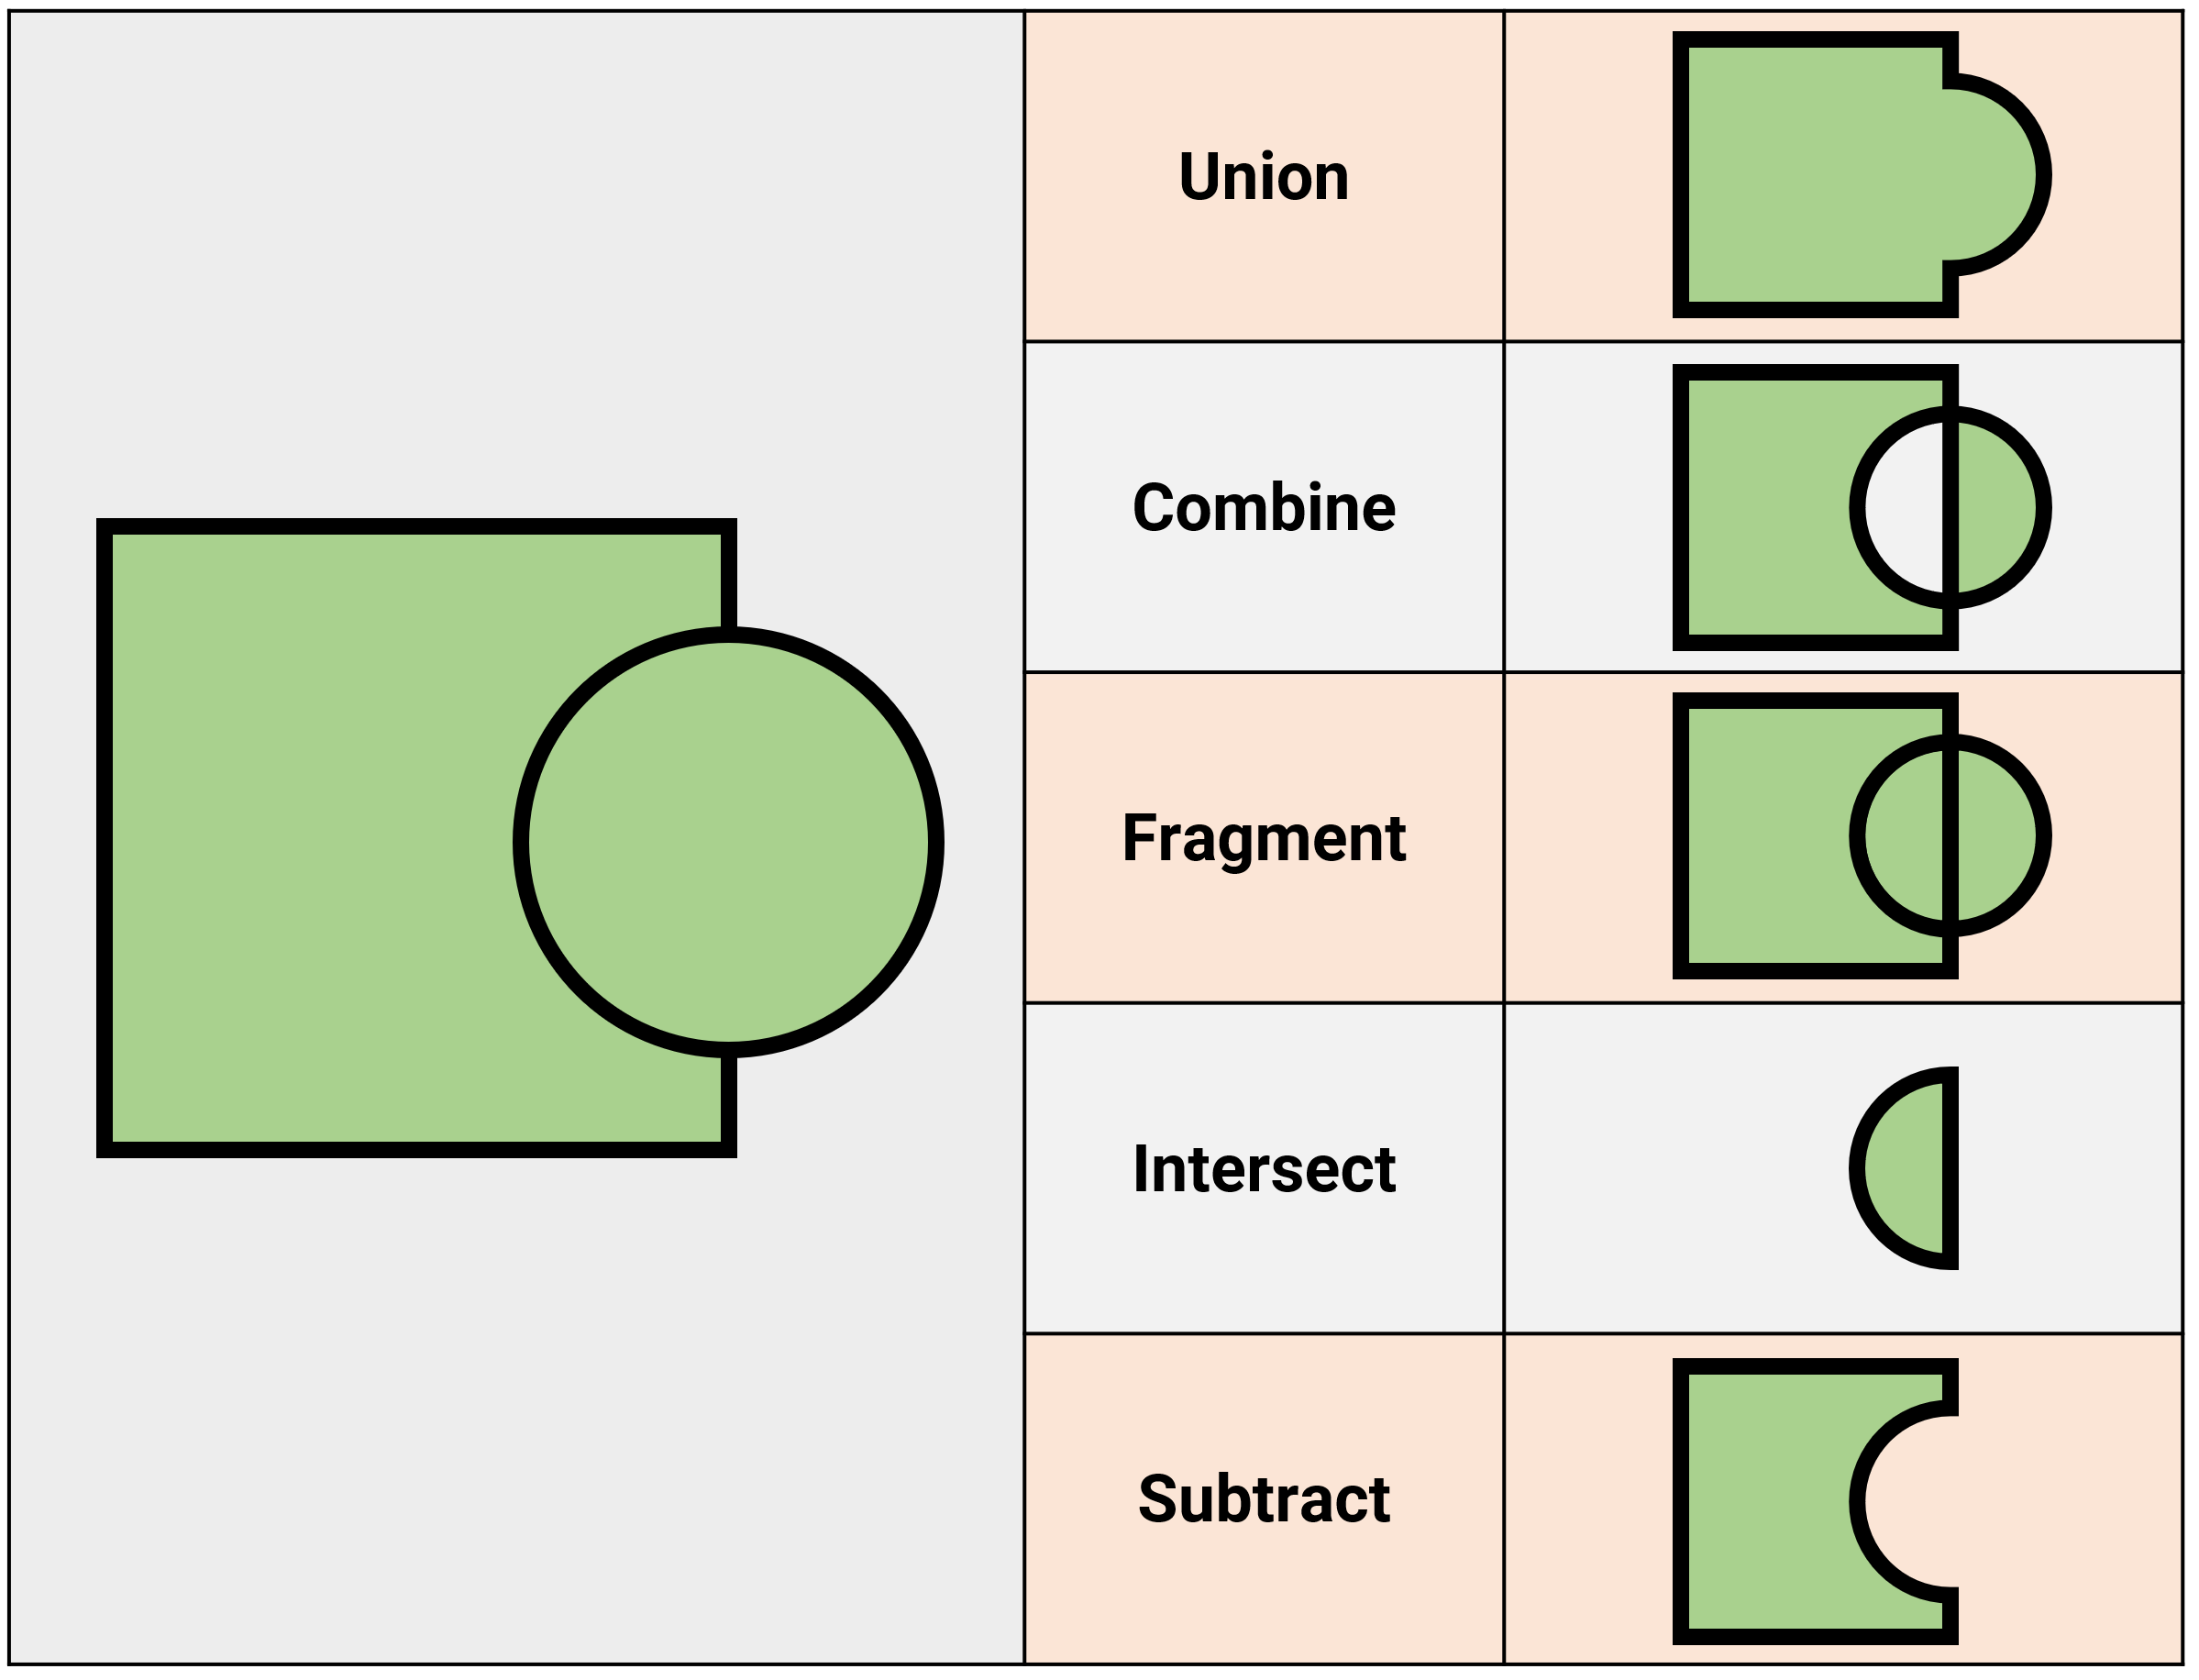
- Union — add shapes, ignoring any overlapping content
- Combine — add shapes, removing any overlapping content
- Fragment — split any overlapping content into new shapes
- Intersect — create a new shape from the overlapping content, deleting the rest
- Subtract — use the shape that’s in front of the other(s) as a mask, deleting it and any overlapping content
The following is what these options do to a circle overlapping a square:
TechSpot.
It’s vital to keep in mind that the front-to-back ordering of the forms you’re merging affects the outcome; for example, in the Subtract example in the above image, the circle cut the square since it was in front of it.
The square would split the circle in half and leave behind a semicircle if the forms were in the opposite order. Therefore, it’s worth trying several things to acquire the unique shape you want!
6. Rotating Shapes: The Key(s) To Improve Reversals
In the most recent releases of PowerPoint, there are a few different ways to rotate shapes. A rotating arrow should appear next to the object’s shape when you click on the item.
Click and hold this arrow while moving your mouse to rotate the thing.
But it’s difficult to do this precisely, especially on laptops with subpar trackpads.
Use the format menu to enter a precise angle size for the rotation (right-click on the shape, select Format object, and then select the Size & spacing icon), but don’t worry.
The best approach to rotate an object is to utilize the keyboard; while holding ALT, press the left or right arrow key to rotate the shape through 15°, or while holding ALT+CTRL, press the left or right arrow key to rotate the shape through 1° of angle.
This technique is by far the finest for rotating very small forms, and with some experience, you’ll be able to spin objects swiftly and precisely.
7. Get What You Sow: Crop And Edit Images Within The App
According to the adage, a picture is worth a thousand words, but picking the correct style for any photos incorporated into a presentation can be a little challenging.
Because PowerPoint has some useful capabilities for quick and simple picture manipulation, you won’t need to utilise another program.
The Crop tool is undoubtedly the best feature.
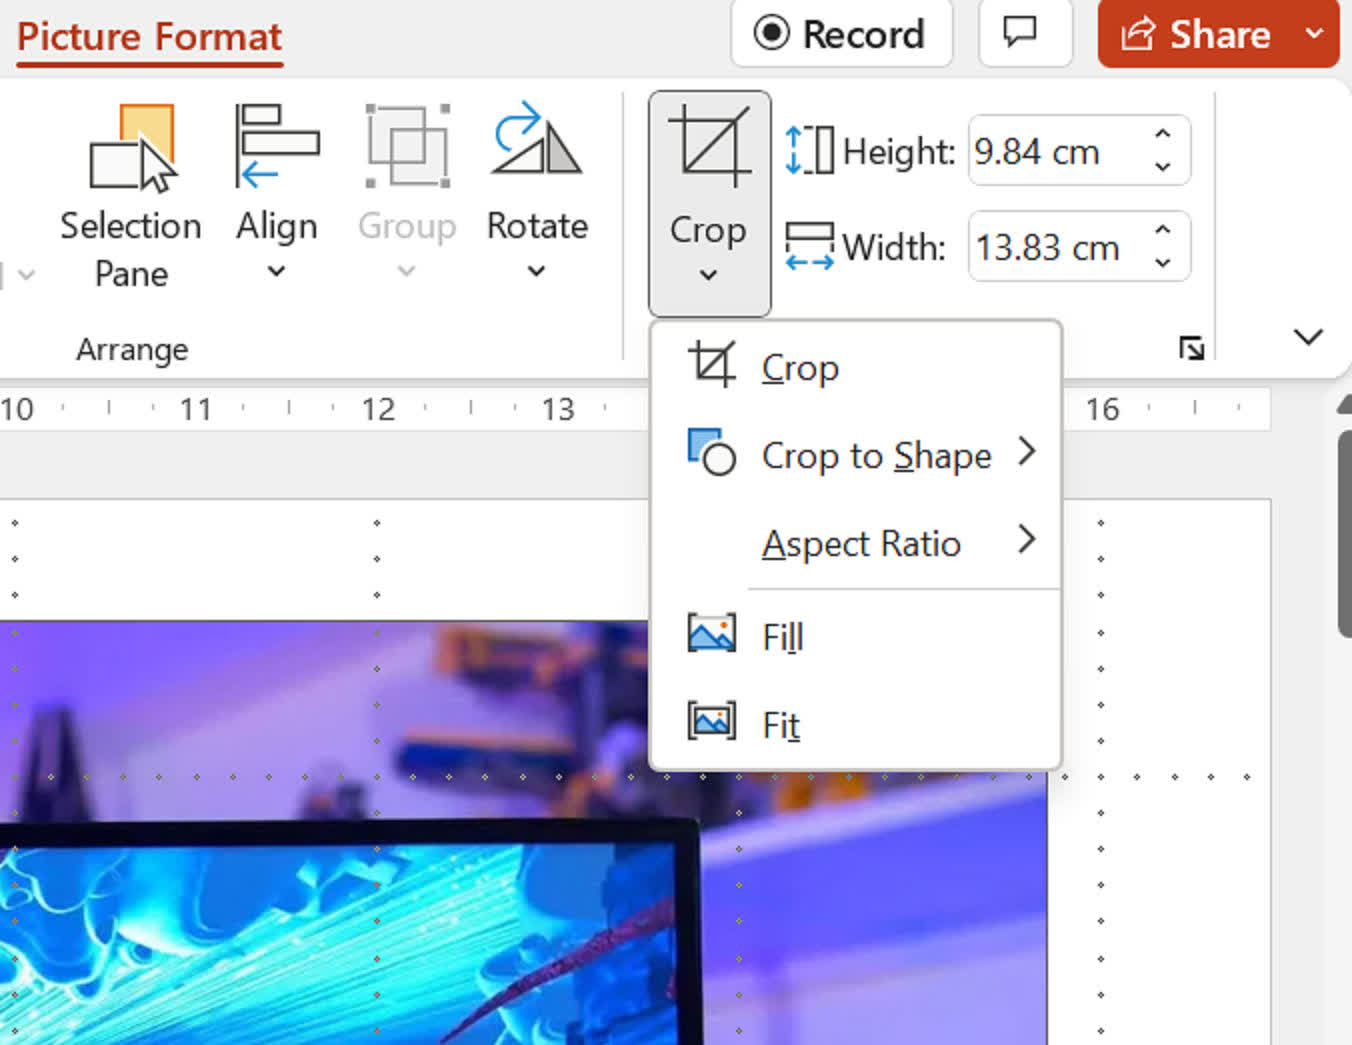
To begin, drag & drop an image into a slide using the Insert > Pictures > This device menu option. If the Crop tool is unavailable in the toolbar, click on the image and select Picture Format.
TechSpot.
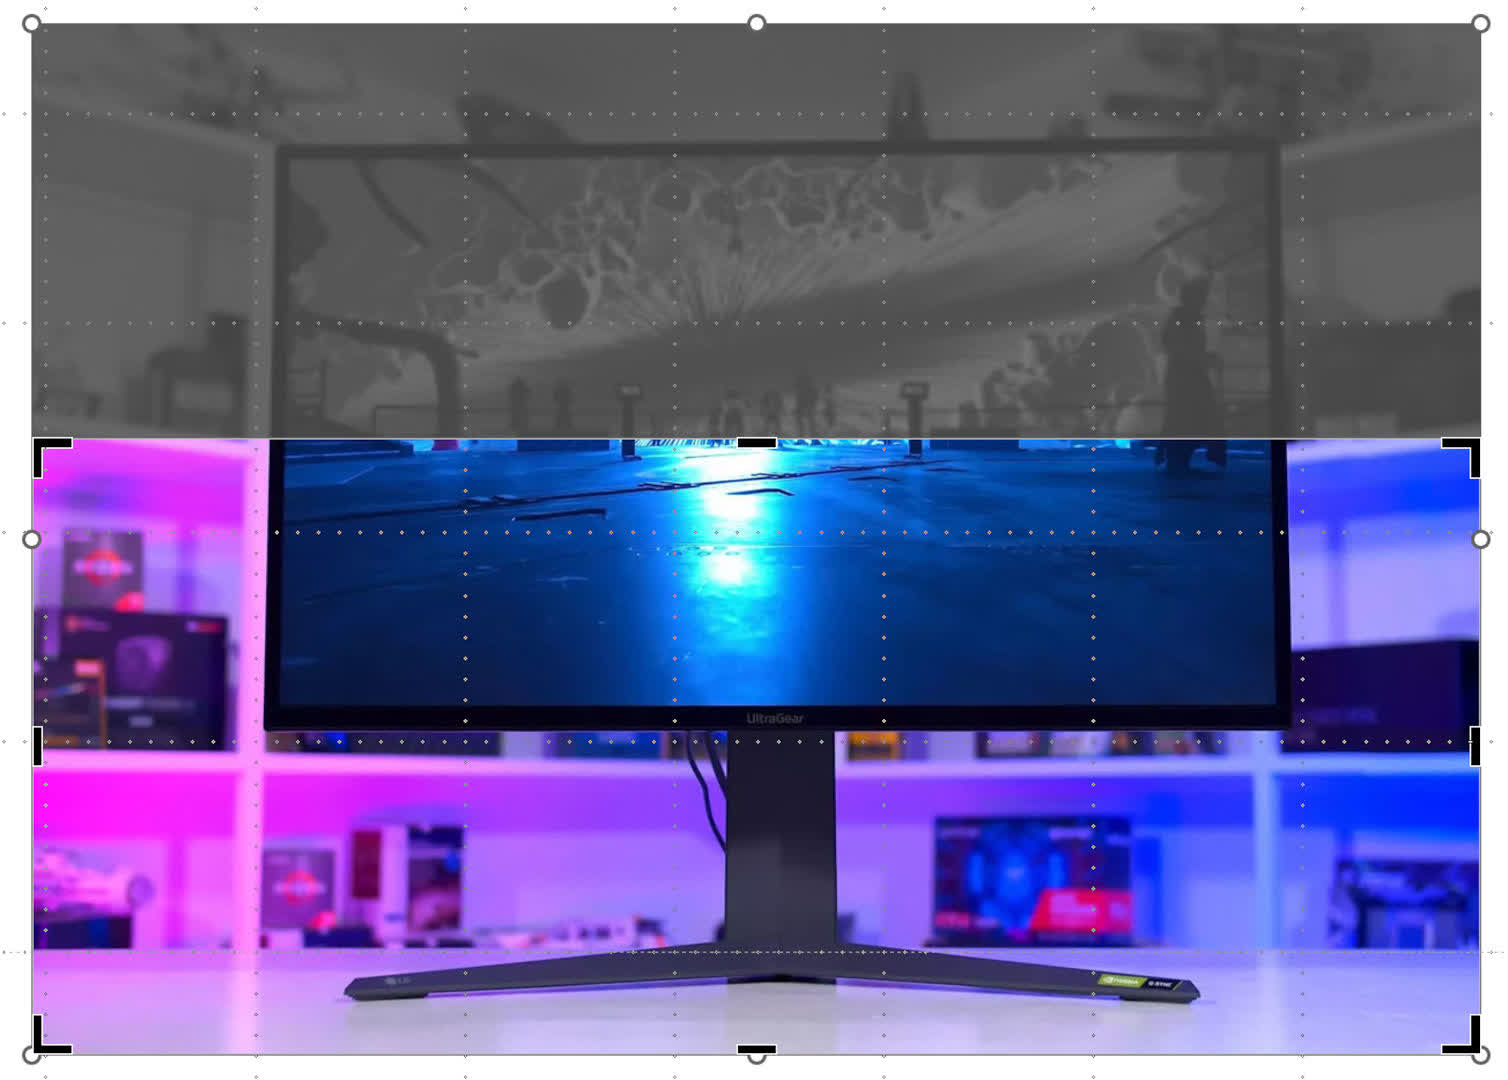
Let’s carefully consider the possibilities since there are plenty to choose from. The first option, titled Crop, will create a number of brief, substantial bars all around the picture.
The image will be cut in half, leaving the portion that isn’t dark behind if you click and hold down the left mouse button while dragging a dark area across the image.
However, unless you click outside the image, nothing will happen.
TechSpot.
This implies that you can return and change the cropping area till you’re happy. If you’re not satisfied with the results, you can always use Undo to return to the original picture.
Note that the corner bars only allow you to produce a piece of the image that is rectangular; they do not apply a diagonal cut effect. You’ll need to utilize a different cropping function to do something finer.
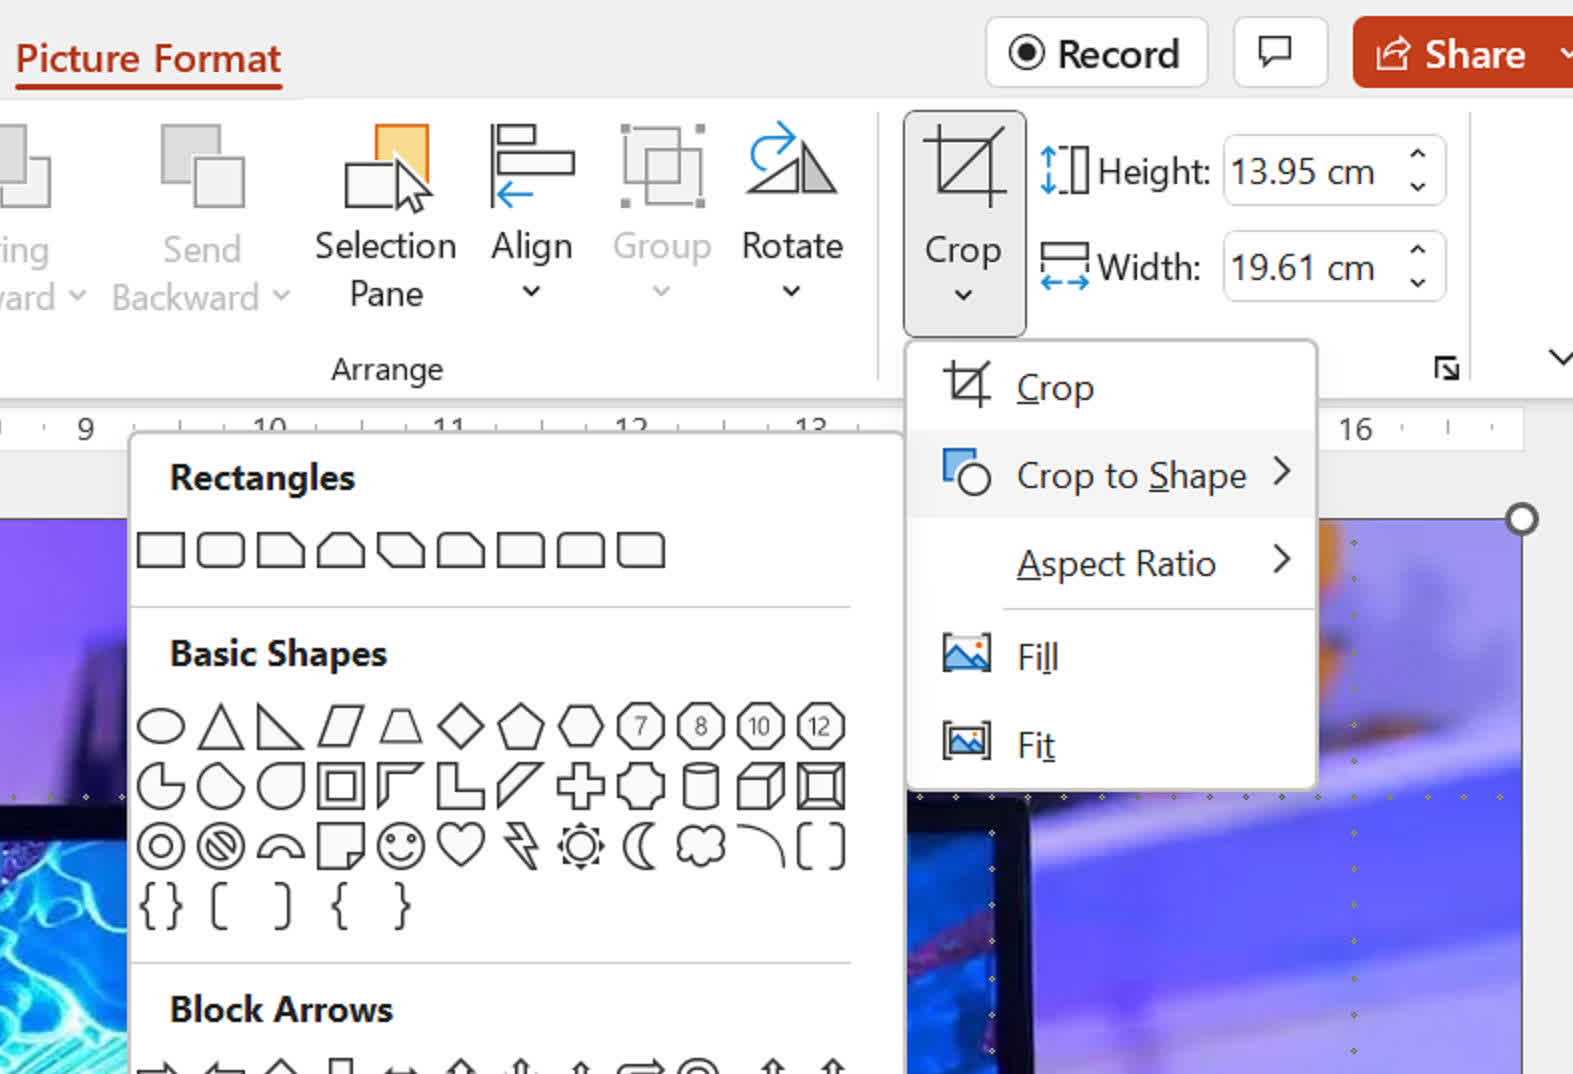
The image will be divided up using either a predetermined height-to-width ratio or a standard shape as a mask in the next two cropping options (Crop to Shape and Aspect Ratio).
TechSpot.
Crop to Shape is particularly helpful for generating images more creatively impactful than the original.
Although not all shapes make for excellent crops, some, like the curved corner rectangle or the block arrows, can readily add the visual impact you’re looking for to your presentation.
After using Crop to Shape, you should choose the last two options (Fit and Fill). A fresh set of black bars will surround the image if you choose one of these.

TechSpot.
Here, both crop-to-shape and fill have been applied.
Although you might lose some of the images in the process, fill will make the image fill the entire shape. While maintaining the image’s aspect ratio, Fit will attempt to make the image fill the shape.
You can make your cropping mask by sketching out various shapes and putting them together (CTRL+A to select them all, CTRL+G to group them).
Copy the image you wish to crop (CTRL+C), then right-click your new mask and choose Format Shape from the contextual menu.

TechSpot.
Select Picture or texture fill from the formatting choices’ Fill section, then select the Clipboard button. After that, your copied image will be pasted into the shape of your mask.
Spend time practicing and experimenting with the many possibilities and cropping options, just like with all of these tools. You may always go back and reverse your adjustments and try again because the original image is never ever lost in any way.
8. Decide On Stealthy Shapes That Overlap Or Are Hidden
It can be challenging to highlight the object you want to move or edit if it is concealed behind a stack of other shapes on a slide with numerous objects spread about.
Fortunately, PowerPoint offers a straightforward technique that enables you to choose an object fast even if you can’t see it.
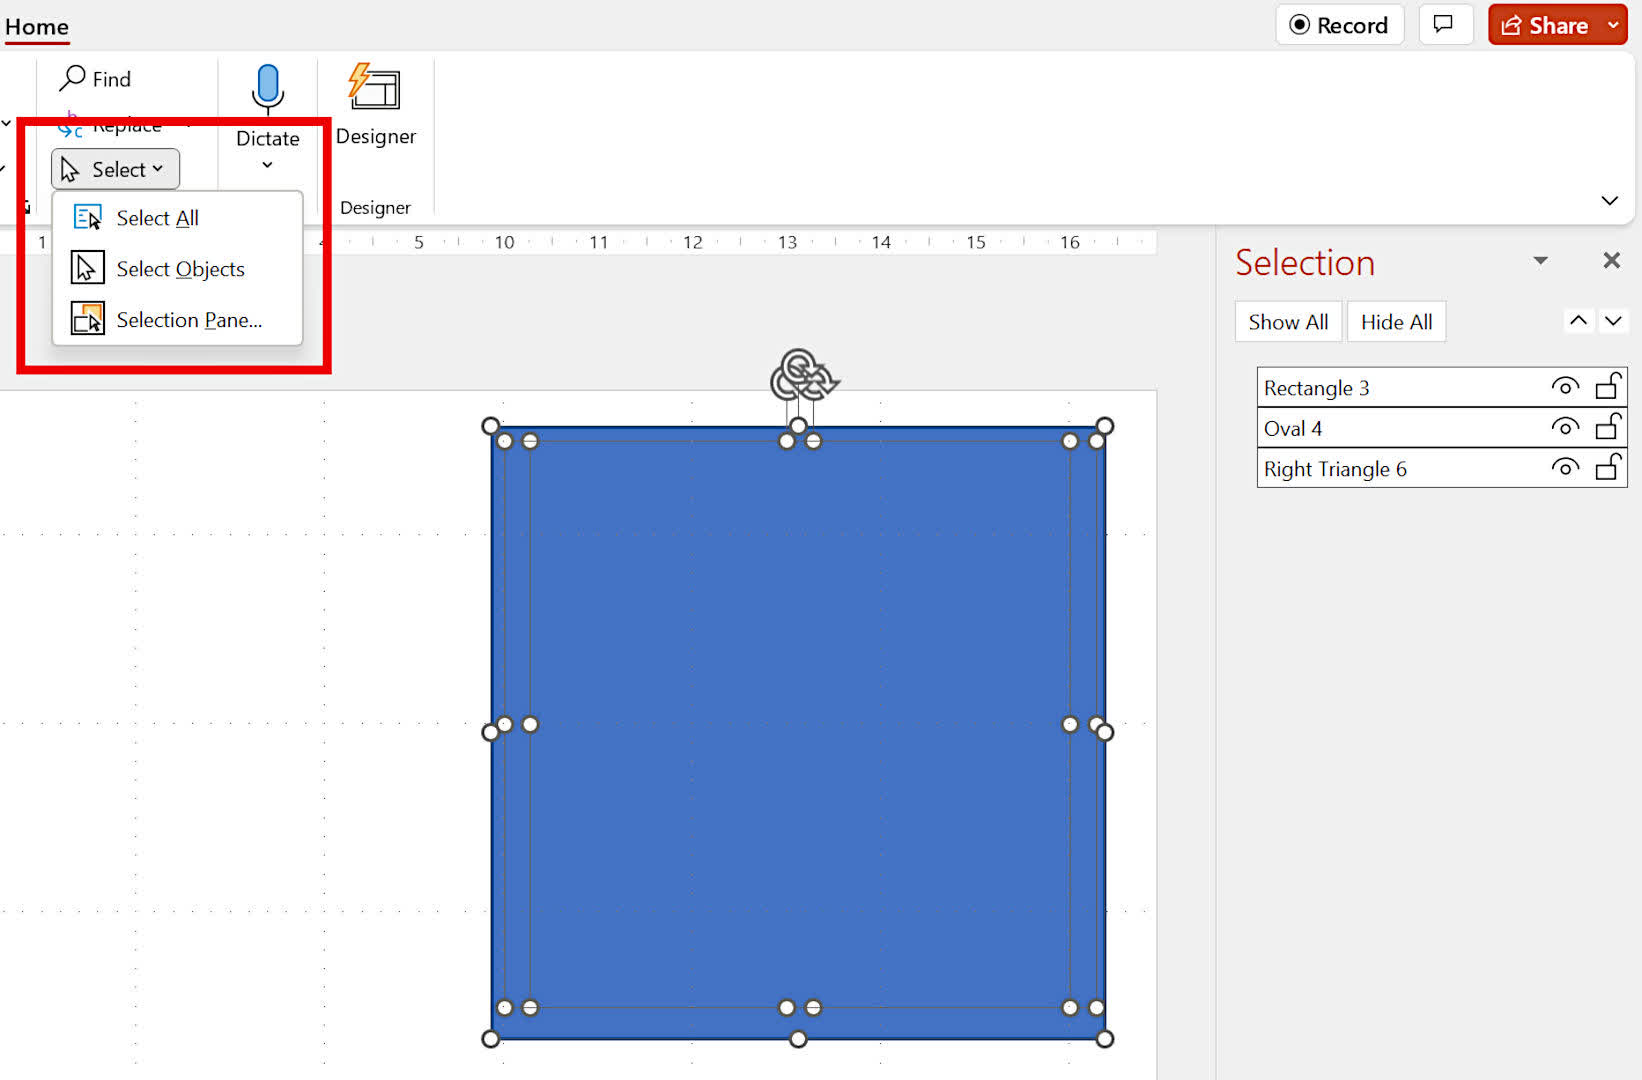
Consider a situation where a square, a circle, and a triangle are present. They are fully obscured because the square is larger than the other two and is in front of them.
TechSpot.
Let’s assume that we wish to alter the circle. To control the objects, click, hold, and drag a highlight box around them. then click Select on the Home toolbar (or consecutively press ALT, H, S, L). Next, select Selection Pane.
Our three objects are arranged here in front to rear order. Any object in the list that is clicked automatically becomes selected, allowing you to move it about, alter its color, or completely remove it.
The object will no longer be visible when you click the tiny eye icon.
While you can still modify the form’s color, the padlock icon will lock the shape and prohibit you from adjusting its size. Even the trickiest slides will now be easy for you to chop and alter!
9. Almost Present With Clever Narration
PowerPoint presentations are frequently required when presenting a talk or lecture, but they don’t require you to be present in person.
You may insert your virtual presence into any slideshow with the appropriate tools and a few minor mouse clicks here and there.
You’ll need a good microphone attached to your computer and a calm space free of echo.
Create all of the necessary slides and material first, then add an audio recording (Insert > Audio recording) to each slide. A speaker symbol will appear on the slide, and a little window will pop up.

TechSpot.
Click the tiny red circle to begin recording after giving each recording a distinct name, even if it’s only “audio slide 1.” Click the tiny square next to it once you’re done.
Click the play button to hear it all through unless your narration for each slide is exceptionally extensive. Simply press the record button to replace your previous work if you’re unhappy.
Once you’re satisfied with the recording, click the OK button, then right away select the Speaker icon from the main toolbar, followed by the Playback option.

TechSpot.
There are a few things to check to ensure you have set up correctly for automatic narration.
Make sure that Play across all slides, Loop until stopped, and Rewind after playing are all unchecked after switching the Start mode to Automatically. Finally, select the option for Hide During Show.
If there is too much silence at the beginning or conclusion of the recording, you can cut the audio in this same region and choose when the narration begins and end.
With each slide transition, the narration will automatically begin, and the speaker symbol will be hidden, thanks to all of these settings. The slides will advance automatically by running the audio on their own as well.
10. No Laser Pointer, No issue!
If you’ve forgotten your laser pointer for a presentation or the batteries have run out, this final tip will come in handy.
Start your PowerPoint presentation (remember tip #1!), and you’ll observe that a cursor will appear on the screen as soon as you move the mouse or touch the touchpad.
It will transform into a perfect laser dot if you press and hold the button while clicking and holding the left mouse button.

TechSpot.
Although it’s not the best thing in the world, and managing the keyboard and mouse/trackpad simultaneously can be challenging, it’s a useful alternative to a pointer.
RELATED CTN NEWS:
How Can a Shipping Company Help You Relocate To India?


